Halloween Outdoor Home Decorating Ideas: Porch, Path and Yard
The houses that stop people on the pavement at Halloween are not usually the ones with the most props in the yard. They are the ones where somebody thought about the dark. Halloween is the only decorating occasion that happens almost entirely after sunset, which means lighting is the medium and everything else is scenery. A cheap inflatable lit properly looks better than an expensive prop sitting in a floodlit garden.
This guide works through the outdoor job in the order it actually happens: deciding what kind of Halloween house you want to be, building the porch, handling the lighting, working with pumpkins and natural material, making props that survive weather, and the practical business of trick-or-treaters, pets, wind and taking it all down. Some of the best ideas here cost almost nothing. Several of the worst mistakes cost nothing to avoid.
Decide What Kind of Halloween House You Want to Be
Pick one of three directions before spending anything: harvest and atmospheric, classic spooky, or full haunted house. Then choose three or four zones to decorate properly rather than scattering things everywhere. A front door, the steps, the path and one focal point in the yard is a complete scheme, and it beats an even sprinkling of props across the whole plot.
The harvest and atmospheric approach leans on pumpkins, dried grasses, corn stalks, lanterns, chrysanthemums and warm light. It reads as seasonal rather than scary, stays up comfortably from early October through November, and works well in a household with small children or on a street where most of the neighbours decorate gently.
The classic spooky version adds the recognisable vocabulary: silhouettes in the windows, bare branches, ghosts, tombstones, a single colour of eerie light, cobwebs used sparingly. This is the sweet spot for most homes. It is genuinely atmospheric, achievable with mostly homemade pieces, and packs away in one afternoon.
The full haunted house involves animatronics, fog, sound, lighting effects and a level of build that takes several weekends. It is a hobby rather than a decorating project, and the honest advice is to build towards it across several years rather than attempt it in one.
Whatever you choose, scale it to the house and the street. A small terraced frontage carries one strong idea well and six ideas badly. A long driveway can take repetition, such as a row of lanterns or a line of tombstones, which reads as far more impressive than the same number of objects clustered in one spot.
Set the timeline early. Mid-October is the usual point where decorations go up, which gives a fortnight of use without the display being weather-beaten by the night itself. Build anything homemade before then, because painting foam or drying fabric props needs dry weather and you will not get it reliably at the end of the month.
The Front Door and Porch: Your Highest-Impact Zone
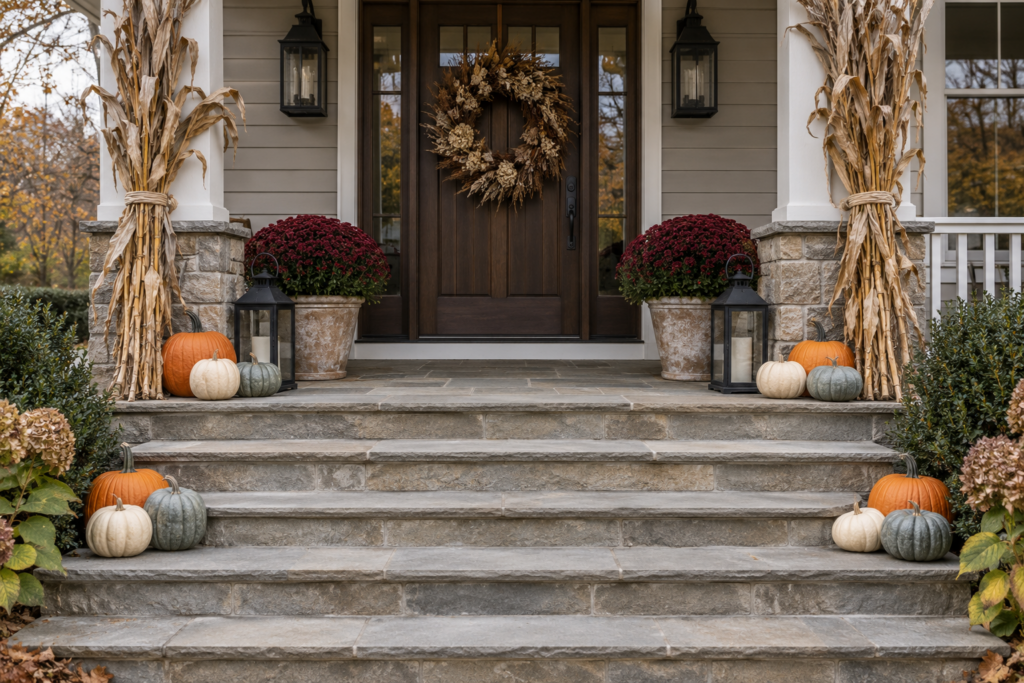
Concentrate the majority of your effort within about ten feet of the front door. A generous wreath, clustered pumpkins on the steps, a pair of lanterns, something vertical at the porch posts, and one lit focal point will do more than anything happening at the far end of the garden. This is the area people walk through, photograph and remember.
Build in layers of height rather than lining things up. Something tall at the porch posts, such as corn stalks tied with twine, tall dried grasses in a heavy pot, or bare branches in a weighted urn. Something at mid-height, such as a wreath on the door and lanterns on a side table or ledge. Something low, meaning pumpkins, gourds and small pots grouped on the steps. That vertical spread is what makes a porch look designed instead of decorated.
Group pumpkins in odd numbers with genuine size variation, and resist the urge to line them up like soldiers along each step. Two or three clusters of three, with a mix of large and small and at least one unusual variety in cream, blue-grey or deep green, looks far more considered than a dozen identical orange ones. Leave the centre of each step clear.
Doors themselves take more than a wreath. A length of black fabric or gauze draped over the frame, a run of dried foliage along the top, silhouettes cut from black card taped inside the glass panels, or simply a very large wreath in dried grasses, twigs and seed heads all work. Anything attached to the door should come off cleanly, so use ribbon over the top of the door or an over-door hanger rather than adhesive in cold damp weather, which lifts paint on removal.
Keep the practical side in mind while you build it. On the night itself, dozens of people will walk this route in costume and in the dark, many of them small. The path and steps need to be clearly lit and completely clear, handrails must stay usable, and nothing should require stepping around. Props belong beside the route, not on it.
Planters carry the porch past Halloween and into November. Chrysanthemums, ornamental cabbage and kale, heucheras, dwarf conifers, birch stems and dogwood all look good in a weathered pot and stay presentable for weeks after the pumpkins have gone. That continuity is the difference between decorating for one night and decorating for a season.
Lighting: Where Outdoor Halloween Decorating Actually Lives
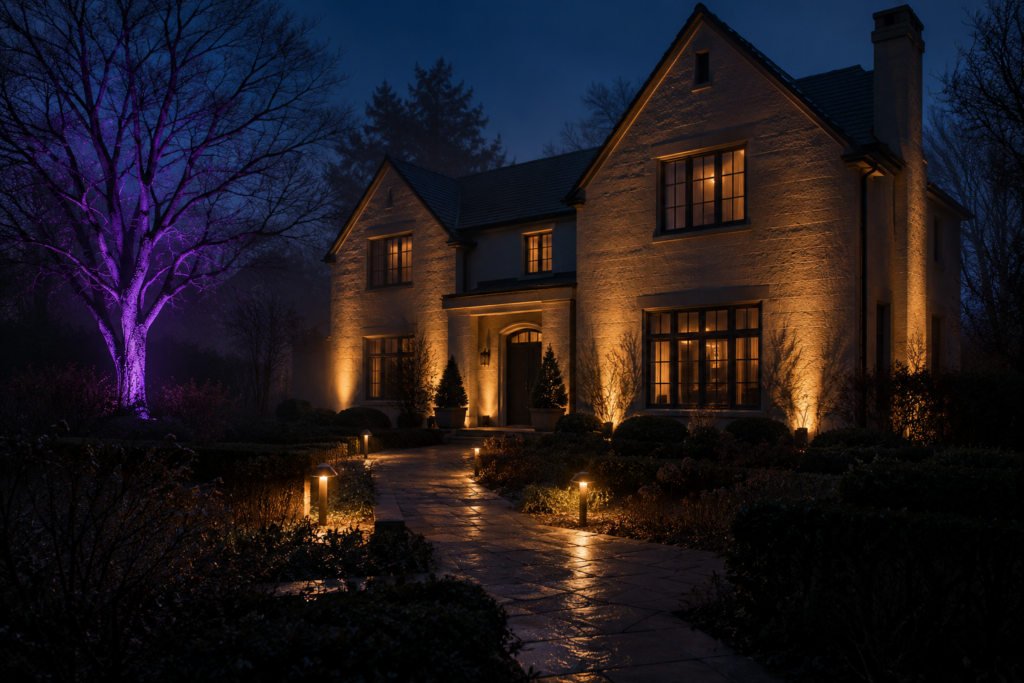
Halloween is an after-dark occasion, so treat lighting as the main project rather than a finishing touch. Turn off or shield harsh white security lighting, uplight the house and trees in one atmospheric colour, keep the path separately and clearly lit for safety, and use flameless candles inside every lantern and pumpkin.
The single most effective technique is uplighting. Place small outdoor-rated spotlights at ground level a short distance from the base of the house wall, a tree trunk or a hedge, angled upward. Light travelling up a surface creates long shadows and a theatrical quality that no amount of ground-level decoration achieves. Two or three uplights on the facade will transform an ordinary house front.
Shadow is as important as light. A display where everything is evenly illuminated has no atmosphere at all. Let large areas of the garden stay dark, light only what you want people to look at, and the lit elements will read far more strongly. This is also why porch and security floodlights usually need switching off for the night, since a single bright white light flattens everything else you have done.
Separate the safety lighting from the atmospheric lighting. The route from the pavement to the door should be properly lit at ground level with stake lights or lanterns, so that nobody in a costume and a mask trips on a step. Do that with warm, low, downward light, and reserve the coloured and dramatic effects for everything off the path.
On the electrical side the rules are the same as for any outdoor display. Use only lights, cables and extension leads rated for outdoor use, protect the circuit with a residual current device or equivalent safety cutout, keep every connection off the ground and out of standing water or use weatherproof connector boxes, and do not exceed the number of light sets the manufacturer permits to be linked together. Run cables along the edges of paths rather than across them, and where a cable must cross a walkway, use a proper cable protector rather than tape. A timer saves both electricity and the trip outside in the cold.
Flameless candles are the right choice for almost every lantern, pumpkin and porch display. They survive wind and rain, they do not set fire to a dry corn stalk or a trailing cobweb, and they can be left on for hours unattended. Reserve real flames for a single supervised lantern well away from anything that can catch.
Fog machines are worth understanding before buying. They work best in cool, damp, still conditions, and low-lying fog that hugs the ground usually requires a chiller of some kind, otherwise the output simply rises and disappears. Fog also reduces visibility on paths, drifts unpredictably into neighbours’ gardens, can trigger smoke alarms if it gets indoors, and is unpleasant for anyone with asthma. Use it in short bursts, away from walkways, or skip it.
What Colour Lights Work Best for Halloween Outdoors?
Warm amber and deep orange give the most atmospheric result and flatter pumpkins, wood, stone and dried foliage. Purple reads as classically spooky and works particularly well washing a wall or a hedge. Green is the most theatrical and the least flattering, so it is best used in small doses on a single feature such as a tree or a window rather than across a whole frontage. Red is very strong and can look alarming rather than fun on a residential street.
The rule that matters more than the colour choice is consistency. Pick one dominant colour with at most one secondary accent, and repeat it. A frontage running amber on the porch, green on the hedge, purple at the window and cool white in the driveway looks accidental, while the same number of lights all in one colour looks deliberate and considerably more expensive than it was.
Pumpkins, Gourds and Natural Material Outside

Real pumpkins remain the most effective outdoor Halloween decoration available, and the ones that look best are usually uncarved. Group them in varied sizes and unexpected colours, keep them out of direct sun and off wet ground, and carve late rather than early, since a carved pumpkin has days rather than weeks.
Variety choice does a lot of work. Beyond standard orange, look for pale cream, blue-grey, deep green, warty and heavily ribbed heirloom types. Mixing three or four varieties in a cluster instantly looks more styled than a matched set. Small gourds fill gaps between larger pumpkins and disguise the awkward spaces where steps meet planters.
No-carve options last far longer and suit a display that has to stand for weeks. Drilling patterns of small holes with a spade bit so light escapes in dots, cutting a single simple shape rather than a full face, painting with matte black or white paint, or simply leaving them whole and letting the arrangement do the work all read well.
For carving, cut the opening in the base or the back rather than the top. The pumpkin then sits down over a light rather than needing one inserted through a lid, the structure stays stronger, and the top does not sag as it dries. Scraping the inside wall down to around an inch thick makes carving much easier and lets far more light through.
Corn stalks, dried grasses, bare branches, seed heads, pine cones and bundles of twigs are all free or nearly free and give the display texture that manufactured props cannot. Tie corn stalks to porch posts with natural twine. Fill a heavy urn with tall grasses so it will not tip. Keep dried material well away from any real flame, since it is extremely flammable when fully dry.
How Do I Stop Carved Pumpkins Rotting Outside?
Preparation buys most of the time. Choose a firm pumpkin with the stalk intact, clean the outside, and scrape the interior thoroughly, since leftover pulp is what rots first. After carving, wash the whole pumpkin including the cut surfaces in a weak bleach solution or a vinegar and water mix, then dry it completely. Sealing the cut edges with a thin layer of petroleum jelly or vegetable oil slows the dehydration that makes carved faces shrivel.
After that it is about conditions. Keep it out of direct sun, off wet ground, and away from any heat source, and use a flameless light rather than a real candle, because heat from a flame cooks the inside and accelerates collapse. Misting it daily with water helps, and in mild weather bringing it indoors to a cool place or the fridge overnight makes a real difference. Expect several days to a week in mild conditions, and considerably longer if the weather is genuinely cold. The simplest solution is to carve two or three days before Halloween rather than at the start of October.
DIY Yard Decor That Doesn’t Look Cheap

Homemade props beat shop-bought ones when they are big, simple and silhouetted. Scale and shape are what read from the pavement in the dark, not detail. A large plywood or cardboard silhouette, a cluster of floating cheesecloth ghosts, and a small group of foam tombstones will out-perform a garden full of small plastic items.
Silhouettes are the highest-impact, lowest-skill project. Cut simple shapes such as cats, bats, figures, ravens or a witch outline from thin plywood, hardboard or heavy card, paint them matte black, and stake them where they will be backlit by an uplight or seen against a lit wall. Matte paint matters; anything glossy catches light and ruins the silhouette effect. Indoor window silhouettes cut from black card and lit from behind with a lamp are equally effective and cost almost nothing.
Ghosts are the classic and they still work. Drape cheesecloth or thin muslin over a form, such as a balloon on a stake or a wire frame, soak it in a mix of white glue and water or a fabric stiffener, and let it dry hard in a dry spell. Once set, remove the form and you have a rigid floating ghost. Hang them from tree branches with fishing line so the support is invisible, and light them from below or place a small battery light inside.
Tombstones are best made from rigid foam insulation board. Cut the shape with a knife, round and distress the edges by hand for age, and seal the surface with a suitable primer before painting, since solvent-based spray paints will eat into bare foam. Dry-brushing grey and black over a light base gives a convincing stone texture. Anchor each one properly with garden stakes or lengths of steel rod pushed through, because foam is extremely light and the first breeze will take it down the street.
Cobwebs deserve a specific warning about technique. Stretched webbing looks good only when it is pulled out until it is nearly transparent and anchored at several points with tension, ideally in corners and across angles. Clumped, dense, half-stretched webbing is the single clearest sign of a rushed display. Use a fraction of the packet you think you need.
Weatherproofing matters for anything homemade. Seal painted surfaces with an exterior varnish or clear sealer, keep cardboard props under a porch roof where they stay dry, and design everything so it can be anchored. Wind is the main enemy: sandbags on bases, tent pegs through fabric, rebar through foam, and heavy pots for anything vertical. Take lightweight props down in advance of a storm rather than retrieving them from a neighbour’s garden afterwards.
Safety, Neighbours, Wildlife and Taking It Down
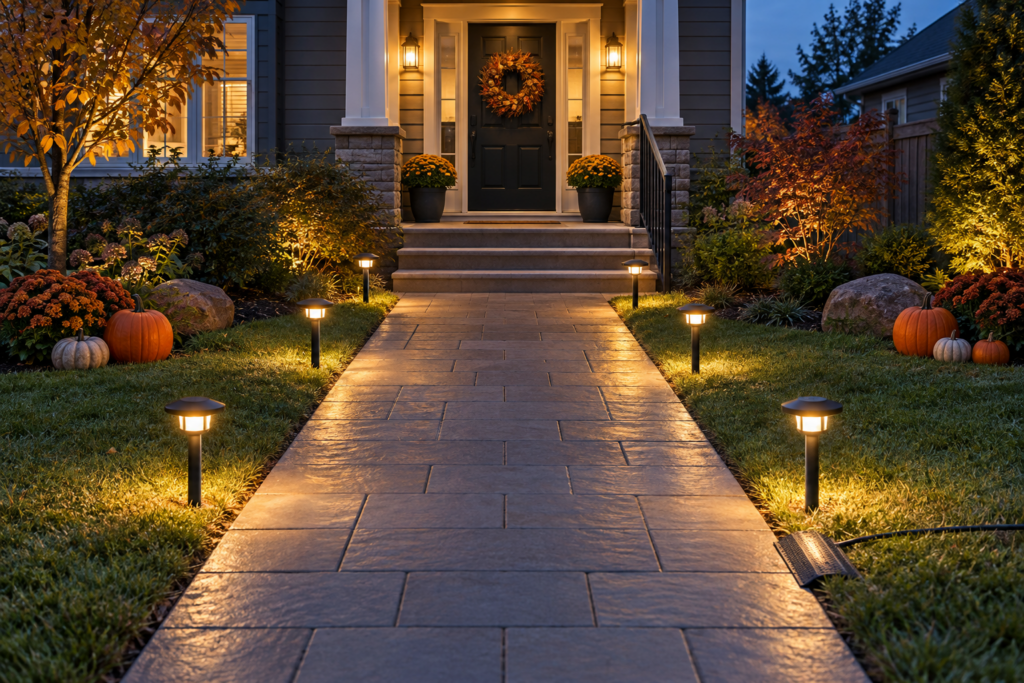
An outdoor Halloween display has obligations that indoor decorating does not. Keep the walking route clear and lit, keep cables out of the path, use flameless lights near anything flammable, avoid netting that traps birds, and gauge the scare level against the age of the children on your street.
Trip hazards are the main practical risk. Steps, cables, guy lines, staked props and low fencing are all invisible to a child in a mask looking at your display rather than their feet. Walk the route yourself in the dark before the night, keep it completely clear, light it properly, and move anything that requires a detour. Check that handrails are still usable and not wrapped in decoration.
Fire risk is genuine and easy to eliminate. Dried corn stalks, hay, cobwebbing, fabric ghosts and costume fabrics all burn quickly. Flameless candles everywhere solves this, and any real flame should be enclosed in a proper lantern, positioned well away from decoration and foot traffic, and never left burning unattended.
Wildlife is the part most people never consider. Stretched artificial cobwebbing and any netting left outdoors regularly traps birds, bats, hedgehogs and small mammals, and animals caught in it frequently do not survive. Use webbing sparingly, keep it high, well away from feeders, shrubs and hedges, and remove all of it promptly after the night rather than leaving it to weather into the garden for months. The same applies to fishing line used for hanging props.
Pets need a thought too. Chocolate and sweets left in reach are a hazard, small props get chewed, and many animals find the noise, costumes and repeated doorbell genuinely distressing. A quiet room away from the front door is kinder than including them in the evening.
On tone, read the street. If your neighbours are decorating gently and your path is full of toddlers, a display heavy on gore, jump-scares and loud sound effects will not be popular, and some households put a lit or unlit porch signal to indicate how intense their display is. Keeping the truly frightening elements away from the walkway, and reserving the atmospheric version for the route to the door, lets you have both.
Take it down promptly. A display that was atmospheric on the thirty-first looks derelict by the tenth of November, and wet cardboard, sagging webbing and collapsed pumpkins are far harder to deal with a fortnight later. Plain, unpainted pumpkins can go on the compost heap or be cut up for wildlife, though anything painted, glittered or coated should go in the bin instead. Store lights wound onto reels, foam props flat, and fabric pieces fully dry, and note anything broken so you can replace it in the November sales.
Frequently Asked Questions
When should I put up outdoor Halloween decorations?
Mid-October is the usual point, which gives around two weeks of enjoyment without the display being weather-beaten by the night itself. Build any homemade props earlier, in September or the first week of October, since painting, sealing and drying all need dry weather. Carved pumpkins are the exception and should go out only two or three days before Halloween.
How do I make outdoor Halloween decor look good rather than tacky?
Go bigger and simpler, use fewer items, and commit to one lighting colour. Large silhouetted shapes read from the street; small plastic props do not. Stretch any cobwebbing until it is nearly transparent, group pumpkins in odd numbers with varied sizes and colours, leave parts of the garden deliberately dark, and lean on natural material such as corn stalks, branches and dried grasses, which always look more expensive than they are.
What are the best light colours for a Halloween display?
Warm amber and deep orange are the most atmospheric and flatter natural materials. Purple works well washed across a wall or hedge. Green is highly theatrical and best used on a single feature rather than everywhere. Whichever you pick, use one dominant colour with at most one accent and repeat it consistently, and keep the walking path separately lit with ordinary warm light for safety.
How long do carved pumpkins last outdoors?
Usually several days to a week in mild weather, and noticeably longer in cold conditions. Scrape the interior thoroughly, wash the pumpkin inside and out in a weak bleach or vinegar solution, dry it completely, seal cut edges with petroleum jelly or oil, keep it out of sun and off wet ground, and use a flameless light rather than a candle. Uncarved pumpkins last for many weeks by comparison.
How do I stop outdoor decorations blowing away?
Anchor everything, and assume wind will be worse than forecast. Use sandbags or heavy pots for anything vertical, tent pegs for fabric and netting, and steel rod or garden stakes pushed through foam props. Tie corn stalks and branches to solid structures with twine rather than leaning them. Bring lightweight and cardboard items in before a storm rather than trying to recover them afterwards.
Are fake cobwebs safe for birds and other wildlife?
Not particularly. Stretched webbing and any netting left outdoors regularly entangles birds, bats and small mammals, often fatally. If you use it, keep it minimal, stretched very thin, positioned high and well away from hedges, shrubs and feeders, and take every strand down promptly after Halloween rather than leaving it to break down in the garden. Indoor use avoids the issue entirely.
How do I decorate for Halloween with only a small porch or a balcony?
Work vertically and lean on light. One large wreath, a cluster of three pumpkins in varied sizes, two lanterns with flameless candles, and a single uplight or a string of warm lights will fill a small frontage completely. Window silhouettes cut from black card and lit from inside cost almost nothing and are visible from a distance, which makes them ideal for a flat with no outdoor space at all.
How do I make the display fun without frightening small children?
Keep anything genuinely frightening away from the route to the door and save it for the wider garden, where it can be looked at from a distance. Avoid sudden noise, motion-triggered jump-scares and gore near the walkway, choose atmospheric lighting over strobes, and lean towards the harvest and classic-spooky styles rather than horror. Many households also use a lit porch light as a simple signal that the display is gentle and visitors are welcome.